Wednesday, October 5, 2016

Lukas's Beautiful Baptism

A few months ago, I organized Lukey's baptism and wanted it to be nothing short of beautiful and pure to reflect my son's spirit.

Before I get into the preparations I made for this magical day, all the steps I took and all the DIY projects I finished, I wanted to start off by saying how much fun we all had, including my little bean!! Everyone was so impressed by how smiley and happy he was throughout the day, considering the fact that he took NO naps.


Ok, now that that is all out of the way, let us get straight to it.

STEP ONE:
Set the date +  Make Reservations + Order Invitations

We set his baptism date based on the season of the year that would be easiest to celebrate, dress nice and get from point A to point B to point C easily. Since Lukas was born in November, we planned to have his baptism in the summer so that transportation would be easy-breezy, no thick outwear would be required and just to have some sun shining all day long. We ended up settling for July 17th. Once this was done, I made a phone call to our church and then to the restaurant to make reservations. Then, I ordered our invitations with +Vistaprint by mid-May. This is probably the time you will need to start thinking of colour scheme you would like to incorporate in the christening, as you will most likely choose an invitation that reflects that. We chose white, mint and gold/champagne.

And generally, it is a good idea to have your invitations sent out about a month before your event, so I sent these out mid-June with an "RSVP by" one week before the event. Vistaprint often has good sales, so if you are planning an event and are organized, wait until you see a deal. (Why not try saving a penny here and there?). By the way, they ship SO quickly!!

Click here to view the invitation I chose!

STEP TWO:
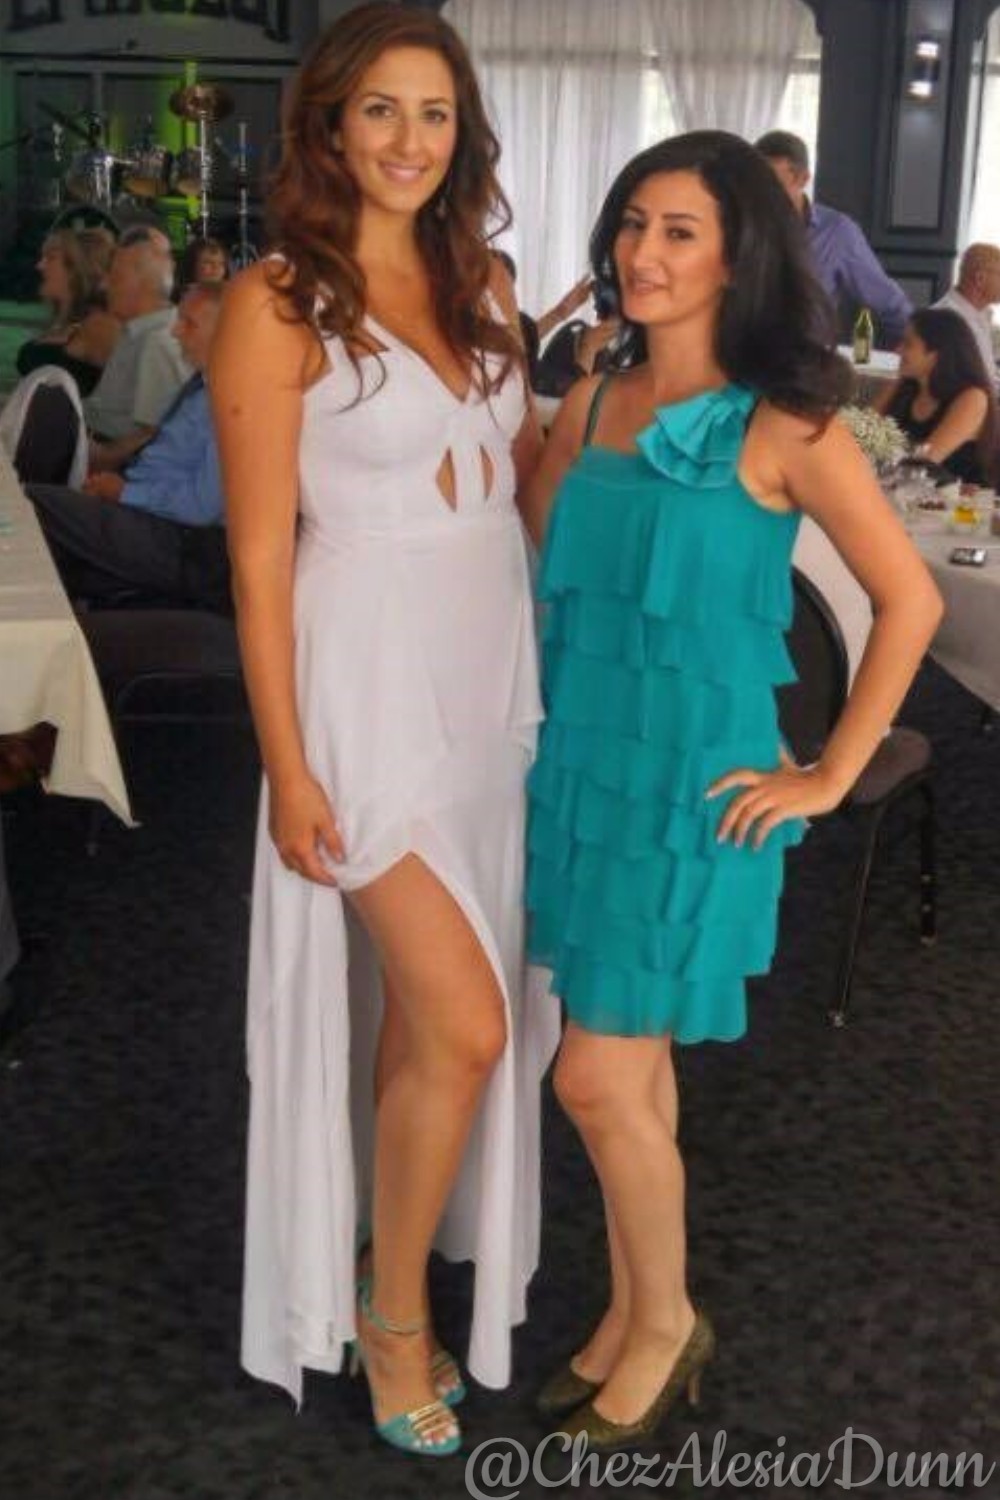
What am I going to wear?!

Remember how I told you to choose a colour theme? Well, I personally think you should stick to that notion when choose your outfit. Daddy can wear a suit with perhaps a tie that matches you, and baby wears all white of course.


I found Lukey's cute little outfit in Little Italy. They always have good taste in clothing and the quality is fantastic. Next, I found my dress at +BCBGMAXAZRIA. I went for a pure white, goddess-like dress that was flowy and absolutely gorgeous. And I paired the dress with stunning aqua +ALDO Shoes featuring gold detailing at the front. Add some nude/white +OPI nail polish, and you have got it all covered, mama! 


STEP THREE:
Online Orders

If you are planning on doing the decorating yourself, make sure to purchase online order about a month and a half to two months before the baptism. Why? Oftentimes, certain items come from places like China, where they may take extra time to arrive. Personally, I ordered a few items that arrived TWO WEEKS after the baptism, making them useless. Thank goodness for sites like Kijiji though. So be smarter than me, and order ahead of time.

Items I ordered included:
  • champagne sequin tablecloths for my dessert and gift tables;
  • birdcage set for envelopes;
  • cupcake wrappers;
  • cross-shaped cookie cutter;
  • chalkboards-on-a-stick display signs;
  • elegant tasting cups for small portions of a custard dessert my mommy made; and
  • elegant mini spoons.
Everything but the wrappers and the display signs arrived on time. That was a bummer, but at least my birdcages and tablecloths made it on time!

The total of all these items including shipping came up to approximately $250 CAD. And something I had forgotten to mention is that I looked into hiring a decorating team to help decorate the dessert table, and they were quoting me at $500 to START, and that did not even include the cost of the actual desserts. Now, the company in question does fantastic work, but with the ideas I had in my head, I was afraid that would turn into more $$$ spent, if you know what I mean (just add a few more $$$$$ and you will get the picture). So I thought it would be wiser to challenge myself and do what I could!

STEP FOUR:
Guest Favours

I had seen this beautiful idea on Instagram of spelling out a name using soap. Unfortunately, I could not find a soap-maker in my city who could do this for me, so, you guessed it, I made them myself! This, I must admit, was VERY time-consuming. But, I saved about $145 doing it myself. In other words, it only cost me about $75 to get the soap supplies and the tulle + ribbons. Can I get a high-five?!

So for sure, if you try something like this, do it ahead of time!! If not, you are better off. Lol.


STEP FIVE:
Decorations

Thanks to +Pinterest, I had known for a while that I wanted to use baby's breath flowers in the centerpieces. They add an angelic, delicate touch. So the questions I was asking myself at this point were:
  • Should I hire a florist to make my centerpieces?
  • What is my budget?
  • Do I think I can make these myself?
  • Can I actually save a significant amount of $$ if I make these myself?
  • Ok... Where can I buy these flowers from in bulk?
  • And vases? What kinds of vases should I use? 
Being the research freak that I am, I quickly took to the internet to find inspiration, +YouTube tutorials, blog tutorials, anything tutorials to figure out how I would make centerpieces.

This was my initial inspiration. How pretty!!
I soon found out that Costco actually sells baby's breath in bulk. What's nice ordering flowers from Costco is that you get to choose a date for them to arrive. They just do not deliver on Fridays, Saturdays or Sundays, but they give ample plant food. And besides, there is a plethora of tutorials online on best ways to keep flowers fresh. Luckily, this type of flower is known to look fresh and stay in bloom for two weeks, give or take. 

Like I said before, you can order baby's breath in bulk. And folks, does it ever come in bulk. A received 14  t h i c k  bunches of baby's breath for $150 CAD. I figured I would have about eight tables (so eight of these centerpieces) and two arrangements for the dessert table. I ended up using about eight to nine of these bunches and sold the rest. (FYI: Costco does not take any unused flowers back).

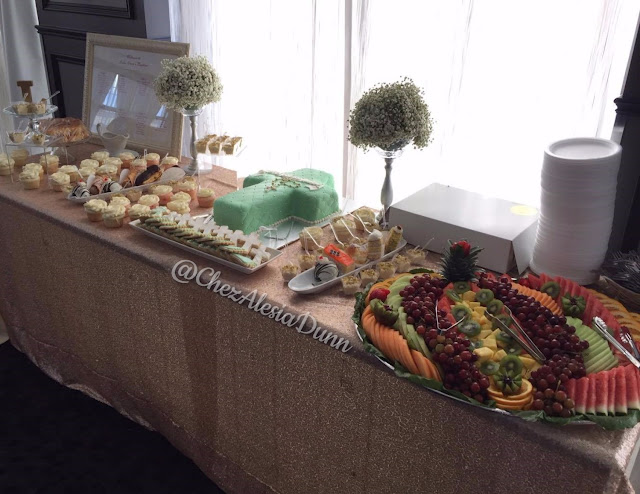
A few sticks of hot glue, silver spray paint and some Dollarama items later, and here is the end result:


STEP SIX:
Order Desserts

In our case, I wanted to have a cake and different-flavoured cupcakes made by a professional. I chose vanilla for the cake, and vanilla for one dozen cupcakes, dulce de leche for another dozen cupcakes and cherry for the last dozen cupcakes. I also have a sweet sugar cookie recipe that I used to make my cross-shaped cookies, and sent them to the same lady who made my cakes so that she could decorate them using royal icing. I picked up my order the day before the baptism and tried resisting eating my whole order on the drive back home.


So there you have it! I am tired of numbering all the steps. If you have any questions about things I may not have covered, please, do ask! :-)

It certainly is not easy planning a baptism, but it sure is tons of fun.

Thanks for the read!

-Alesia D.


Let's get social!


Come and join me on Instagram @ChezAlesiaDunn

Did you like this post? Tell me which ideas inspired you most!
It would mean so much. :)

Wednesday, August 3, 2016

U.S.H.: The Unmatched Sock Hanger - Review

Today, I have the great pleasure of announcing the launch of a very new product called the U.S.H. (the Unmatched Sock Hanger). Basically, consider your children's socks a guaranteed find every time you look for them. Why? Well, instead of throwing socks into a drawer, where they run a big risk of getting eaten by the big, bad Sock Monster, the U.S.H. enables you to hang socks in pairs using the clips on either side of this device. If you are a parent, or even person, like me, you must lose your socks quite often, only to never find them again. Just watch the video below and learn some more about the U.S.H.!!


When I was first introduced to this product by Joey Ring, its creator, I was skeptical but curious. And guess what, it proved to do what it was meant to do! As a result, I have been able to save some $$$ on socks I would have otherwise lost and I do not have to waste my time looking for them. Can we just say #doublemomwin anyone?

One nice thing about the U.S.H. is that it comes in a variety of colours. And since Lukey's room is rather neutral, the clear U.S.H. goes perfectly. For those kinds of mamas and daddies out there, COLOUR COORDINATION IS EVERYTHING.

On another note, there is no need to limit this sock hanger to, well, hanging socks. No, it can also be used to hang cute baby headbands, jewellery, accessories, baby shoes, and other small items. Just use your imagination!


And I have to say, collaborating with Joey has been a pleasure. Any time there was a question or an issue, his response was within 24 hours, if not immediate. So it is with confidence that I say that he is a professional at what he does, and you will not be disappointed by the Unmatched Sock Hanger and the customer service that comes along with it.

Click here to find out how to get your hands on one of these beauties, set to be delivered by October 2016!!!

Thanks for reading :-)

-Alesia D.

Monday, July 25, 2016

Lukas is Almost NINE Months Old!

Oh. My. Goodness. Please don't give me judgy eyes, I KNOW I have been majorly slacking for the past few months; however, these have been some of the best few months of my life, so I am only half embarrassed that I have not been blogging that much.

Firstly, my little Lukas is not so little anymore. In fact, he now weighs a whopping 27-ish lbs, independently sits, crawls backwards, babbles a lot, and has started eating different types of purees, from mango to fully cooked eggs and beef. He has a personality to die for and is as sweet as the best dessert you can think of. He is so curious about everything and everyone around him and smiles all the time.


My happy baby now has six little pearly whites and has the most beautiful brown eyes I have ever seen. He sleeps full nights and tries imitating sounds mommy and daddy make. He claps his hands, signs with his hands when he wants you to pick him up and twists his wrists to show he is dancing!

Ugh, I could go on forever (and I bet any mom can relate) but let's give a quick update on what has been going on over the past few months in the world of Alesia Dunn.

To begin, March and April were really tough on me. I had a mix of what felt like PPD and wanderlust, so much so, that I was very close to booking a trip to Florida with my baby boy (since daddy was busy working) just to get away and "break the routine". But instead, I called up some relatives in beautiful British Columbia and decided to head there in June! May was an amazing/quick-passing month. Like, it  f l e w  by. Matthew and I got to celebrate our first birthdays with mister Lukas, and I had my first official Mother's Day. On June 8th, I travelled with Lukeybear to Vancouver, and it was the first time I'd taken a plane without my husband since we started dating! (I will write a post on travelling alone with a baby and a comparison between +WestJet and +Air Canada in another post, because I think I have some useful information for mamas travelling alone with their kids!!)

Then in end of June, I did a road trip with my son. This time, it was to Niagara Falls for a meet-up with several moms I met through the +What To Expect forum board, which then became a +Facebook group, which then became friendships and meetups. So Lukey and I have been everywhere—my new travel buddy!

Oh, oh, and my baby boy got baptised last weekend! It was beautiful, and my boy was just a pleasure. Although he was tired, he was still smiley and ready to indulge in the good food, and even better company. I made all the centrepieces and the seating chart myself. (Let me know if you would like to see pictures and tutorials!)

So that's that for now. Man, I am kind of proud of myself for actually writing this post, I did not think I could finish writing it in one day!

Stay tuned for more :-)

-Alesia D.

Thursday, April 7, 2016

Chickpea Salad

Ahh, spring. A time when there's that extra spring in your step and when good food just tastes better. There is no denying that le printemps brings on the need to try fresh, new recipes. Well, it does for me anyway, and I have to say that I have developed a taste for chickpea salad. I have seen it at restaurants, in grocery stores and even on my Facebook feed, so I have decided to make a batch of my own! And all I can say is that it is SO GOOD.


The nice thing about this type of salad is that it is so so so nutrient-dense. In my recipe, I combine things like chickpeas (obvious), kidney beans, lemon, garlic and avocado. And by only mentioning these five ingredients, I can confidently say that you will be consuming lots of protein, fibre, vitamins (C, D, B, E, K, etc), iron, folic acid, omega-3 fatty acid and more. It is a good option for vegetarians/vegans who are looking for meat alternatives and for those who enjoy tangy foods.


Bonus: In a rush? This salad does not take much time to make! But I suggest letting it sit in the fridge for at least half an hour before serving to allow all the flavours to blend.

Ready? Read below for the recipe!


Chickpea Salad

Ingredients:
  • 1 can who chickpeas (750g), drained;
  • 1 can kidney beans (450g), drained;
  • 3 garlic cloves, crushed;
  • ½ small red onion, finely chopped;
  • 1½ ripe avocados, diced;
  • 1½ lemons, juiced (add pulp);
  • 3-4 tbsp olive oil;
  • 1 heaping tbsp dried parsley; and
  • salt to taste (~2 to 3 tsps)*.
Directions:
  1. Start by crushing your garlic and use that bowl to make your salad.
  2. Combine all ingredients together.
  3. Mix well.
  4. Cover with saran wrap and let sit in fridge for at least 30 minutes before serving.
  5. Enjoy!

*For the salt, you should not only be focussing on your preference, but also for an amount that helps balance out the bitterness of the lemon juice. Too little, and your salad will taste too lemony; too much, and your salad with taste very salty.

Thanks for following my recipe! Make sure to leave a comment below if you made this, telling me what you think!

-Alesia D.

Friday, March 11, 2016

Cream Cheesed-Filled Banana Bread

Cream Cheesed-Filled Banana Bread

A few months ago, I put several packs of cream cheese, actually thinking I would have the time to bake while being at home with my then-newborn. And boy, was I wrong. To be honest, my first few months at home were filled with changing a newborn, feeding a newborn, and sleeping with a newborn because we would be up for some part of the night. Ya. Let me rethink that baking thing.

Forward to 4+ months post-partum, those packs of cream cheese are just weeks away from going bad, so my oh-so smart husband suggested I make cheesecakes or cream cheese-filled banana bread. Added bonus: Since Lukey and I have finally started getting into the groove of a more established routine, and he is more independent, I have more time to pick up baking and other hobbies I enjoy doing. So I got to experiment, and the results were delish!

I realize it's not the HEALTHIEST recipe out there, but who doesn't enjoy something sweet stuffed with something else? Oh, and if you don't want your banana bread looking like mine, make sure to follow my instructions below and LET IT COOL DOWN before you cut it. :)

Give it a try, I promise it will not disappoint!


Cream Cheese-Filled Banana Bread

Ingredients
For banana bread:
  • 3-4 very ripe bananas, mashed;
  • ⅓ cup butter, melted;
  • ¾ cup brown sugar;
  • 1 egg, beaten;
  • 1½ cups flour;
  • 1 tsp vanilla extract;
  • 1 tsp baking soda;
  • pinch of salt;
  • ½ tsp cinnamon (or to taste); and
  • rolled oats (for decoration at the end).
For cream cheese filling:
  • 1 pack of cream cheese (regular or light) at room temperature; and
  • ¾ cup powdered sugar.
Instructions:
  1. Preheat oven to 350°F (or 175°C) and butter a 4"x8" loaf pan.
  2. Place bananas in medium-sized bowl and mash them as well as you can.
  3. Start adding all other ingredients for the banana bread to this bowl. Mix well.
  4. For the cream cheese filling, combine both ingredients and blend.
  5. Pour half of the banana bread batter into greased pan, then pour all of the cream cheese filling, followed by the rest of the banana bread mix
  6. Sprinkle some oats on top for decoration.
  7. Place in the oven for 53 minutes. My oven is strong, so 53 minutes is all I need, but depending on the strength of your oven, you may want to use a cake tester, such as a fork, knife or toothpick, to make sure your loaf is done.
  8. Remove your yummy treat from the pan, let it cool in the fridge for 30 minutes (this allows the cheese cheese filling to firm up a bit), then cut and serve!
Until the next post!

-Alesia D.


Let's get social!

Come and join me on Instagram @ChezAlesiaDunn

Did you like this recipe? Tell me about it and tag me in your photo on Instagram!
It would mean so much. :)

Wednesday, March 9, 2016

Yummy Hummus

Last weekend, I had a girls' night with my mother-in-law and sister"(s)"-in-law, and we made some yummy, and mostly healthy snacks and desserts. One thing that brings me back to my roots AND always bring back positive feedback is my homemade hummus. (So naturally, this is my go-to when I get invited to a potluck.) It is a big hit every single time I make it, and I always have people asking me for the recipe.

Well friends, the time has finally come.

It's good with pita, with meats like kafta or simply with carrots or other vegetables. Hummus is very versatile, as it can be eaten as a snack or as a side in a Middle-Eastern bbq. Another plus is that if you make it yourself instead of buying from a store, you avoid all the unnecessary extra ingredients + preservatives and get to eat a fresh product.

I'm lucky that my dad passed down his recipe to me, because it has the perfect amount of everything.

Now without further ado, I present my recipe!

Disclaimer: When eating hummus, make sure to bring a pack of mint gum with you. You will thank me for this.


Lebanese Hummus


Ingredients:
  • 2 plump garlic cloves;
  • 1⁄2 tsp salt;
  • 11⁄2 lemons juiced with pulp;
  • 1 can crushed chickpeas; and
  • 1 cup tahini (or how ever much you like).
Directions:
  1. Place garlic cloves and salt in bowl and crush using a mortar.
  2. Add lemon juice and pulp into the bowl. Mix ingredients together.
  3. Open the can of crushed chickpeas and empty contents into the same bowl. Mix.
  4. Pour tahini in, a bit at a time, and mix each time. Give it a taste once the consistency gets thicker. When the hummus becomes pleasing to your palate, you know it is ready.

ENJOY!!

-Alesia D.
Let's get social!

Come and join me on Instagram @ChezAlesiaDunn

Did you like this recipe? Tell me about it and tag me in your photo on Instagram!
It would mean A LOT. :)

Friday, March 4, 2016

Baby Lukas is Four Months Old!

Today, we are celebrating baby Lukey's 4-month old birthday. I can't believe it has already been four whole months since he has been in this world and that I have been a mommy.

I. Have. Learned. A. Lot. And something tells me I will only be learning more and more and more. He has also changed a lot and learned tons in these few, short month. It is really a beautiful thing to watch your child grow right in front of you.

He now:
  • laughs and giggles;
  • pays more attention to his surroundings;
  • presses buttons on his bouncer and toys;
  • reacts to and loves nursery rhymes;
  • babbles and coos a lot more;
  • tries to copy sounds mommy and daddy make;
  • likes to touch e v e r y t h i n g;
  • is very active;
  • reacts to his reflection in the mirror;
  • loves sitting up (assisted);
  • is extremely curious about the things we eat and drink;
  • has gone up another diaper size; 
  • tries to turn around onto his back from his belly; and
  • wears 9-month old clothing.
A few weeks ago, my baby caught his first cold, so it was my first time dealing with a stuffy nose, fever, and occasionally, a cranky baby. Poor little guy woke up congested every morning, so I quickly became good friends with his nasal aspirator and humidifier. His paediatrician recommended feeding him in small quantities (I still breastfeed) more often, as he vomited after each feeding. And he finally got better a week later.

I have also noticed him drooling more often. And over the past two weeks, he has been biting on his fingers as a way to perhaps soothe his irritated gums, so I finally bough him soothing teethers.

The month of February also gave baby Lukas the chance to have his very first Valentine (me!). I did a little DIY Valentine's shoot with him, and the pictures were a hit. (You can see them below.)

My hubby and I also discovered he has a thing for selfies. Every time he sees a phone, he stares into the lens and starts acting funny. He alternates between, laughing, acting tough, smiling, and posing. It's the cutest thing ever. And so far, it seems that we have a very social baby. As long as mommy and daddy approve, Lukas enjoys playing with others and is comfortable enough to be left without us. Thankfully, he enjoys playing with the caregivers at my gym daycare while I work out, and he always likes being with his grandparents, aunts and uncles.

I can't wait to see what else he will learn and do in his fourth month of being!

Thanks for reading!

-Alesia D.


Let's get social!
Follow me on Instagram @ChezAlesiaDunn

Did you enjoy this post? Write to me!